

How to Add a Woosmap Store Locator to Your Shopify Store, No App Required
Table of contents
If you sell in physical stores as well as online, one of the most common things a visitor does on your Shopify site is look for the nearest shop. When that search is slow, inaccurate, or buried three clicks deep, you lose the visit, and often the sale that would have happened in store.
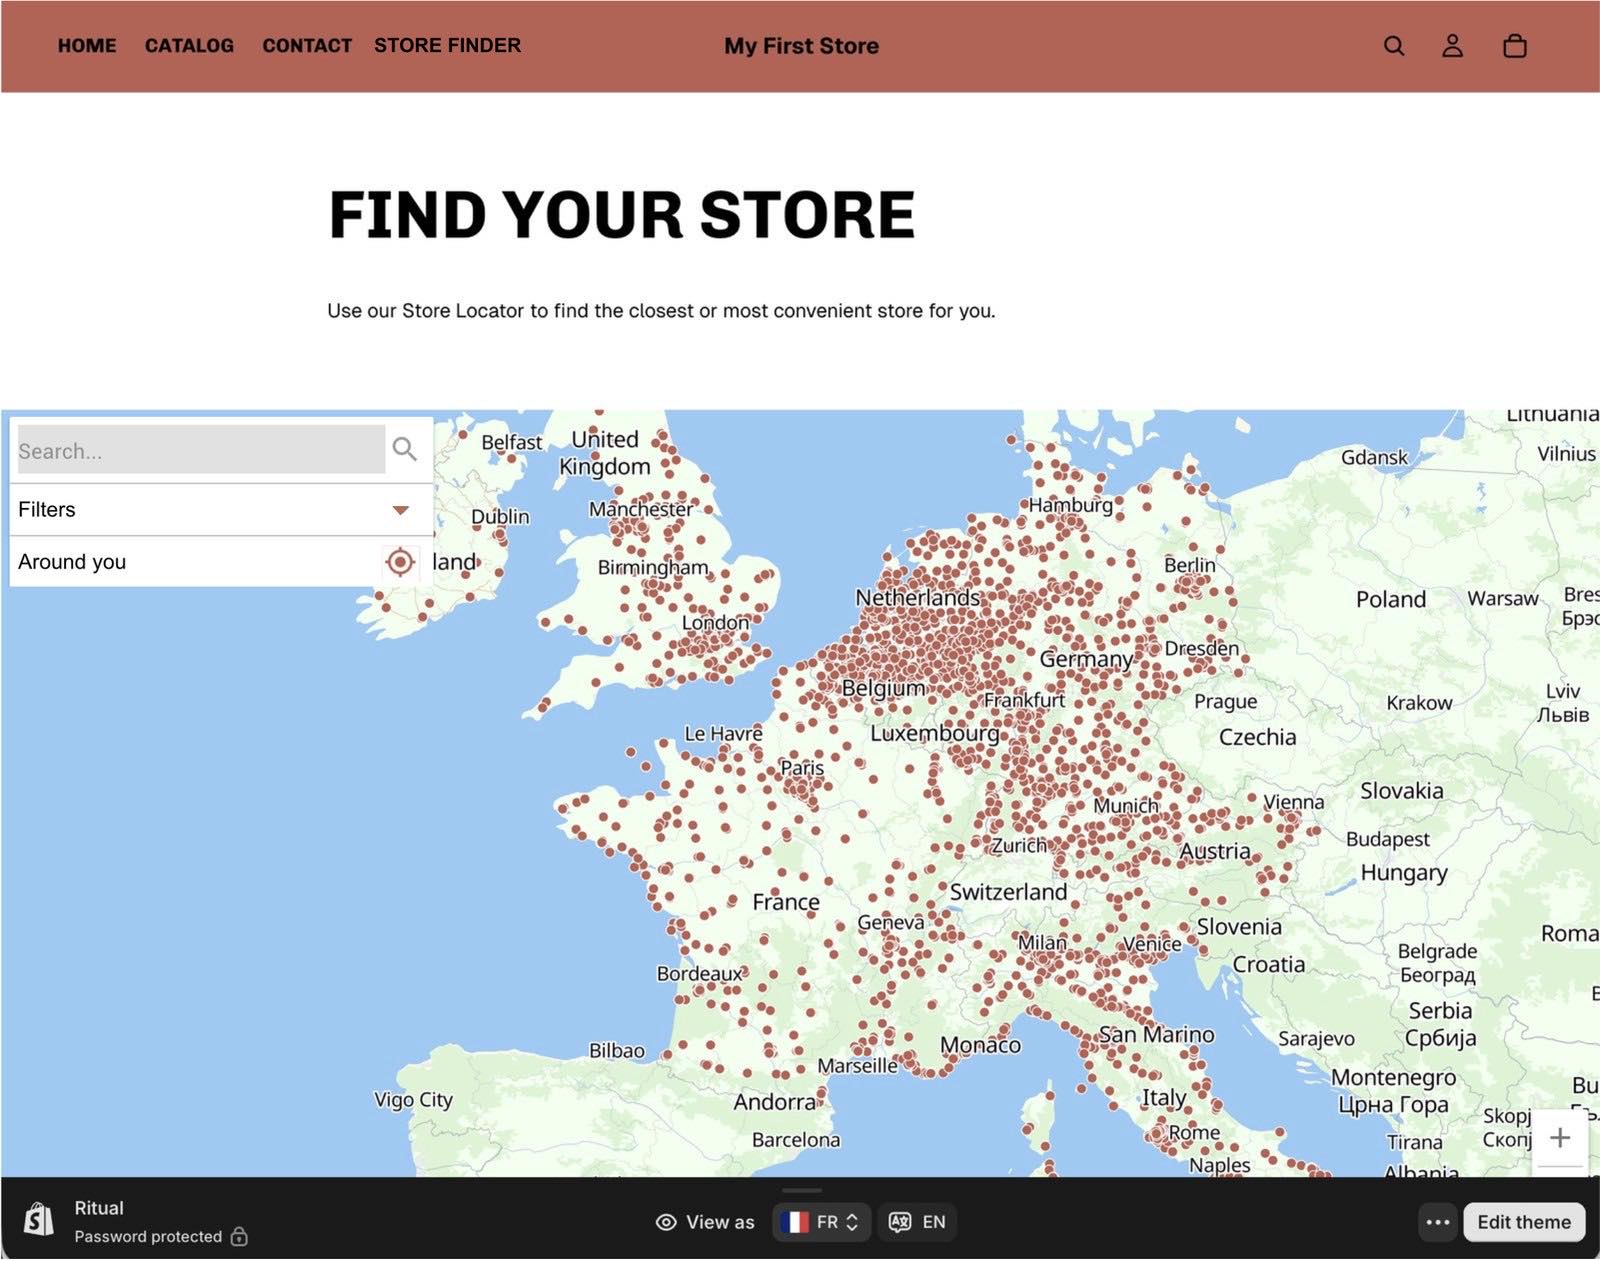
The good news: adding a proper store locator to Shopify does not have to mean a marketplace app, a monthly subscription per feature, or a development sprint. With the Woosmap Store Locator Widget, you can add a fast, accurate "Find a store" page to any Shopify theme in about ten minutes, working entirely inside the Shopify admin.
This guide walks through the whole thing, step by step. You do not need to be a developer to follow it, but if you have one on the team, they will be comfortable with it too.
Why not just install an app?
Most Shopify store locators are apps you install from the App Store. Apps are convenient, but they come with trade-offs: another recurring bill, another third party with access to your storefront, limited control over how the map looks and behaves, and data about your shoppers flowing through a tool you do not control.
The approach in this guide is different. You add the Woosmap Store Locator Widget as a custom theme section, a native building block of your Shopify theme. That means:
- No app to install. Nothing from the App Store, no extra subscription tied to the feature.
- No Shopify CLI, no local dev environment. Everything happens in the theme editor in your browser.
- Works on any Online Store 2.0 theme. Dawn or a custom theme, it does not matter.
- You stay in control. The map, the data, and the configuration live in your theme, and you can change or remove them whenever you want.
Once the section exists, anyone on your team can drop the store locator onto a page from the theme customizer, the same way they would add a banner or a product grid.
What you need before you start
Two things:
- Access to your Shopify admin, specifically the ability to edit your theme code (Online Store → Themes → Edit code).
- A Woosmap public API key, it starts with
woos-…. If you do not have one yet, create a free account in the Woosmap Console, add your stores, and generate a public key. The Store Locator Widget quick start covers this in a few minutes.
A quick note on the key: the public key is meant to live on your storefront. It is referrer-restricted, which means it only works on the domains you allow. It is safe to expose in your theme, that is exactly what it is designed for.
Prefer to test safely first? Duplicate your live theme (Online Store → Themes → the ⋯ menu → Duplicate) and do everything below on the copy. You can preview it, get it right, and publish only when you are happy.
The five steps
Here is the whole process at a glance. Each step is detailed below.
- Open the theme code editor
- Add the JavaScript file
- Add the CSS file
- Create the section
- Add the section to a page and paste your key
Step 1: Open the theme code editor
In your Shopify admin, go to Online Store → Themes. On the theme you want to edit, click** Actions → Edit code**.
You will see a file tree on the left with folders like Assets, Sections, and Snippets. This is where the next four steps happen.
Step 2: Add the JavaScript file
This small script loads the Woosmap web app and renders the map. It is written so you never have to touch it again, all your settings will come from the theme editor later.
- In the left panel, under Assets, click** Add a new asset**.
- Choose Create a blank file.
- Name it exactly
store-locator.js. - Paste the code below, then click Save.
(function () {
  var WEBAPP_SRC = 'https://webapp.woosmap.com/webapp.js';
  var CONFIG_SELECTOR = 'script.woosmap-store-locator__config';
  var MOBILE_QUERY = '(max-width: 600px)';

  function parseConf(raw) {
    if (typeof raw !== 'string' || raw.trim() === '') {
      return { conf: {}, error: null };
    }
    try {
      var value = JSON.parse(raw);
      if (value && typeof value === 'object' && !Array.isArray(value)) {
        return { conf: value, error: null };
      }
      return { conf: {}, error: 'Configuration must be a JSON object.' };
    } catch (e) {
      return { conf: {}, error: e.message };
    }
  }

  function buildConf(settings) {
    settings = settings || {};
    return parseConf(settings.advancedJson).conf;
  }

  function ensureWebApp(win, doc, cb) {
    if (win.WebApp) {
      cb();
      return;
    }
    win.__woosmapWebAppQueue = win.__woosmapWebAppQueue || [];
    win.__woosmapWebAppQueue.push(cb);
    if (win.__woosmapWebAppLoading) {
      return;
    }
    win.__woosmapWebAppLoading = true;
    var script = doc.createElement('script');
    script.src = WEBAPP_SRC;
    script.async = true;
    script.onload = function () {
      var queue = win.__woosmapWebAppQueue || [];
      win.__woosmapWebAppQueue = [];
      for (var i = 0; i < queue.length; i += 1) {
        queue[i]();
      }
    };
    doc.head.appendChild(script);
  }

  function readConfig(el) {
    var node = el.querySelector(CONFIG_SELECTOR);
    if (!node) {
      return null;
    }
    try {
      return JSON.parse(node.textContent);
    } catch (error) {
      return null;
    }
  }

  function showConfigError(el, doc, message) {
    var box = doc.createElement('div');
    box.className = 'woosmap-store-locator__error';
    box.setAttribute('role', 'alert');
    box.textContent = 'Woosmap Store Locator — invalid Configuration (JSON): ' + message + '. Using default configuration.';
    el.insertBefore(box, el.firstChild);
  }

  function initContainer(el, win, doc) {
    if (!el || el.dataset.wslRendered) {
      return;
    }
    var config = readConfig(el);
    if (!config || !config.publicKey) {
      return;
    }
    el.dataset.wslRendered = 'true';
    var result = parseConf(config.advancedJson);
    if (result.error && win.Shopify && win.Shopify.designMode) {
      showConfigError(el, doc, result.error);
    }
    ensureWebApp(win, doc, function () {
      var isMobile = typeof win.matchMedia === 'function' && win.matchMedia(MOBILE_QUERY).matches;
      var webapp = new win.WebApp(el.id, config.publicKey);
      webapp.setConf(result.conf);
      webapp.render(isMobile);
    });
  }

  function initAll(win, doc) {
    var containers = doc.querySelectorAll('[data-woosmap-store-locator]');
    for (var i = 0; i < containers.length; i += 1) {
      initContainer(containers[i], win, doc);
    }
  }

  var boot = function () { initAll(window, window.document); };
  if (window.document.readyState === 'loading') {
    window.document.addEventListener('DOMContentLoaded', boot);
  } else {
    boot();
  }
  window.document.addEventListener('shopify:section:load', boot);
})();
You do not need to read this line by line. The short version: it waits for the page to be ready, loads the Woosmap web app once, reads the settings you will enter in the theme editor, and draws the map. It also re-renders correctly while you are editing in the theme customizer, so the preview stays live.
Step 3: Add the CSS file
This controls the size and spacing of the store locator so it sits nicely inside your theme.
- Under Assets, click** Add a new asset → Create a blank file**.
- Name it exactly
store-locator.css. - Paste the code below, then click Save.
.woosmap-store-locator {
  width: 100%;
  height: var(--wsl-height, 600px);
  min-height: 320px;
}

.woosmap-store-locator__setup {
  padding: 1rem;
  text-align: center;
  color: rgb(var(--color-foreground, 18 18 18));
}

.woosmap-store-locator__error {
  padding: 0.75rem 1rem;
  margin-bottom: 0.5rem;
  border: 1px solid #d72c0d;
  border-radius: 6px;
  background: #fff4f4;
  color: #8e0b00;
  font-size: 0.875rem;
  line-height: 1.4;
}
The map defaults to 600px tall. If you want it taller or shorter later, that single height value is the one to change.
Step 4: Create the section
A "section" is what turns all of the above into a block you can add to any page from the theme customizer, without ever touching code again.
- In the left panel, under Sections, click** Add a new section**.
- Name it
woosmap-store-locator. - Delete any placeholder content Shopify generates, paste the code below, then click Save.
{%- liquid
assign public_key = section.settings.public_key | strip
assign container_id = 'woosmap-store-locator-' | append: section.id
-%}
{%- capture woosmap_config -%}
{
"publicKey": {{ public_key | json }},
"advancedJson": {{ section.settings.advanced_json | json }}
}
{%- endcapture -%}
{{ 'store-locator.css' | asset_url | stylesheet_tag }}
<div
id="{{ container_id }}"
class="woosmap-store-locator"
data-woosmap-store-locator
>
<script type="application/json" class="woosmap-store-locator__config"></script>
{%- if public_key == blank -%}
<p class="woosmap-store-locator__setup">Add your Woosmap public key in the section settings to display the store locator.</p>
{%- endif -%}
</div>
<script src="{{ 'store-locator.js' | asset_url }}" defer="defer"></script>
{% schema %}
{
"name": "Woosmap Store Locator",
"settings": [
{
"type": "text",
"id": "public_key",
"label": "Woosmap public key",
"info": "Referrer-restricted public key (woos-…). Safe to expose on the storefront."
},
{
"type": "textarea",
"id": "advanced_json",
"label": "Configuration (JSON) — required",
"info": "Woosmap setConf as JSON. Must include \"maps\": { \"provider\": \"woosmap\" }, otherwise the store locator will not work correctly. Invalid JSON is ignored."
}
],
"presets": [
{
"name": "Woosmap Store Locator"
}
]
}
{% endschema %}The {% schema %} block at the bottom is what creates the two settings fields, Woosmap public key and Configuration (JSON), that you will fill in from the theme editor in the next step. That is what keeps the technical part out of everyone else's way.
Step 5: Add the section to a page
Now the fun part, placing it on your storefront.
- Go to Online Store → Themes → Customize.
- Navigate to the page where the store locator should appear. If you do not have one yet, create a new page first (for example, "Find a Store") and come back here.
- Click Add section.
- Select Woosmap Store Locator from the list.
- In the settings panel on the right:
- Paste your Woosmap public key into the Woosmap public key field.
- Paste a configuration into the Configuration (JSON) field. This field is required, without it, the map will not display correctly. Use the sample below as a starting point.
- Click Save.
That is it. Your store locator is live on that page.
Your starter configuration
The Configuration (JSON) field is where you tell the widget how to behave, where to center the map, how many results to show, and your brand color. It must always include "maps": { "provider": "woosmap" }.
Copy this as a starting point and adjust it to your business:
{
  "datasource": {
    "maxResponses": 5,
    "maxDistance": 50000
  },
  "maps": {
    "provider": "woosmap",
    "localities": {
      "types": []
    }
  },
  "theme": {
    "primaryColor": "#3578f6"
  },
  "internationalization": {
    "lang": "en",
    "unitSystem": 1
  },
  "woosmapview": {
    "initialCenter": {
      "lat": 51.5074,
      "lng": -0.1278
    },
    "initialZoom": 12
  }
}
Keep these three consistent with your market: initialCenter (where the map opens), lang (your audience's language), and unitSystem (0 for metric km, 1 for imperial miles). The sample above is UK-coherent; for a metric market, set unitSystem to 0. Note that maxDistance is always in meters, whatever the display unit.
Two changes to make it yours:
initialCenter, setlatandlngto where you want the map to open (your flagship store, your city center, or the middle of your main market).primaryColor, set it to your brand color so the markers and buttons match your storefront.
One rule to remember: this field expects strict JSON. That means double-quoted keys, no trailing commas, and camelCase property names (maxResponses, not max_responses). If the JSON is invalid, the widget ignores it and, in the theme editor, shows a small red note telling you exactly what to fix. Don't treat this as a safety net, though: the map needs a valid configuration to render (at minimum "maps": { "provider": "woosmap" }), so a broken or empty config means no map, not a working default. Fix the JSON before you publish.
Everything else about how the locator looks and behaves (search radius, custom markers, result cards, filters) is configurable through this same field. The full configuration reference lists every option.
If something does not look right
Most issues come down to one of five things. Here is how to read them:
| What you see | What it usually means |
|---|---|
| "Add your Woosmap public key…" message | The public key field is empty, paste your woos-… key. |
| Map area is blank, no error | The key is invalid, or your Woosmap project has no stores near the map's center. |
| A red note in the theme editor only | Your Configuration (JSON) has a typo, check the quotes and commas. |
| Works in the editor preview but not on the live page | Refresh the live page. The editor auto-refreshes on every change; a live page does not. |
| Map does not display correctly | The Configuration (JSON) is empty or missing "maps": { "provider": "woosmap" }. |
If you get stuck, you are not on your own. Unlike the large map providers, Woosmap gives you direct access to a real support team that knows the product, not a ticket queue that routes to a chatbot. Send us the page URL and a screenshot of your settings panel, and we will help you sort it out.
Why teams choose Woosmap for this
Adding the map is the easy part. The reason retailers move their store locator to Woosmap is what happens after launch:
- Accuracy that sends customers to the right place. Woosmap sources its location data from the best providers in each market (Royal Mail in the UK, Eircode in Ireland, and equivalent authoritative sources elsewhere), so a "near me" search returns stores that are actually near, not an address three streets off.
- Predictable costs. You get enterprise-grade accuracy and reliability at around half the cost of comparable providers, with pricing you can plan around rather than a bill that balloons with your traffic.
- Your data stays yours. Woosmap does not use your data or your shoppers' location searches to power advertising or other products. What your customers search stays between you and them.
- No lock-in. The section lives in your theme. You own it, you can change it, and you are never held hostage by a provider.
Get started
If you already have a Woosmap public key, the five steps above will have you live in about ten minutes. If you do not, create a free account in the Woosmap Console, add your stores, and generate a key, then come straight back here.
Want a hand tailoring the locator to your brand, or planning a rollout across several storefronts? Talk to our team, we know the product and we answer quickly.
Further reading