


Automate Data Import with CircleCI and Github
Here at Woosmap we love to work with CircleCI, a continuous integration solution that aims to help developers “ship better code, faster”. This tutorial teaches you how to automate the task of importing data into Woosmap database using CircleCI and Github. It’s not the main goal of this tool as in this case, we’re not using it for continuous deployment and continuous integration but for continuous import and delivery to our end users. By doing so, we ease the availability of updated data on production.
Basic Concepts
Data Integration
As we saw in this previous post, one of the first steps toward benefit from having your store data hosted on Woosmap is to combine and transform original datasets of locations into a unified format and structure supported by Woosmap. Many of you had the opportunity to integrate data using ETL software (Extract, Transform, Load) like FME. It’s a really good solution outside of manual coding. Once you have built your workflow and executed it, your data would be online. But one important aspect is to keep it updated. It’s the purpose of this tutorial.
Continuous Integration
Continuous Integration (CI) is a development practice that requires developers to integrate code into a shared repository several times a day. Each check-in is then verified by an automated build, allowing teams to detect problems early. By integrating regularly, you can detect errors quickly, and locate them more easily.
Continuous Deployment
Continuous Deployment is closely related to Continuous Integration and refers to the release into production of software (or data) that pass the automated tests. Essentially, it is the practice of releasing every good build to users.
Workflow of Illustrated Sample
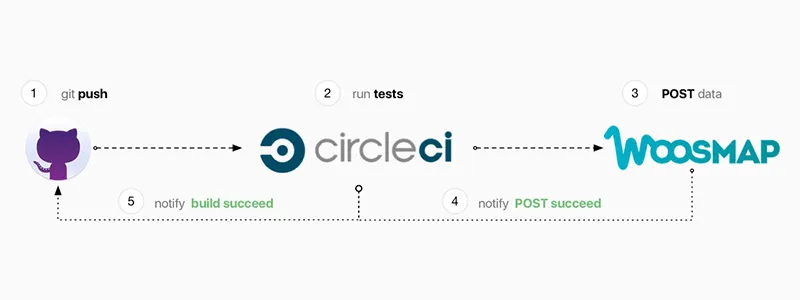
You can find the source code of the sample we use here on our Woosmap Github Organization. The purpose is to securely and automatically push new data on Production to your end users. Before doing this, the whole Continuous Delivery process needs to be run.
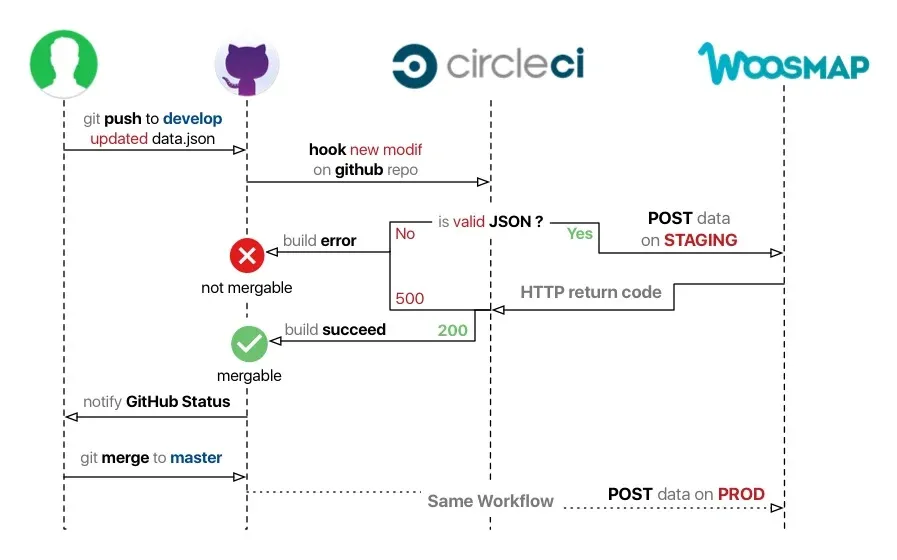
The first step is to create and push an updated version of your data file (on the develop branch in our case but not necessarily). This will trigger a build in CircleCI which will validate the JSON. Once the test is passed, the file is sent on a Staging server and, if the import succeeds, to the Production server.
CircleCI
CircleCI is a hosted Continuous Integration service that takes care of automated testing, building and deployment of your applications. You can connect it to any project hosted on GitHub. A service hook is then attached that will ping CircleCI every time you push new commits to GitHub. Whenever the hook is triggered (it detects new commits), it pulls the latest source code, starts a new VM for the project and runs the tasks defined in the circle.yml configuration file in the repository root. If any of those tasks fails, the build is marked red and cancelled. Otherwise, it is marked green and deployed to the runtime environment.
Creating a CircleCI Account
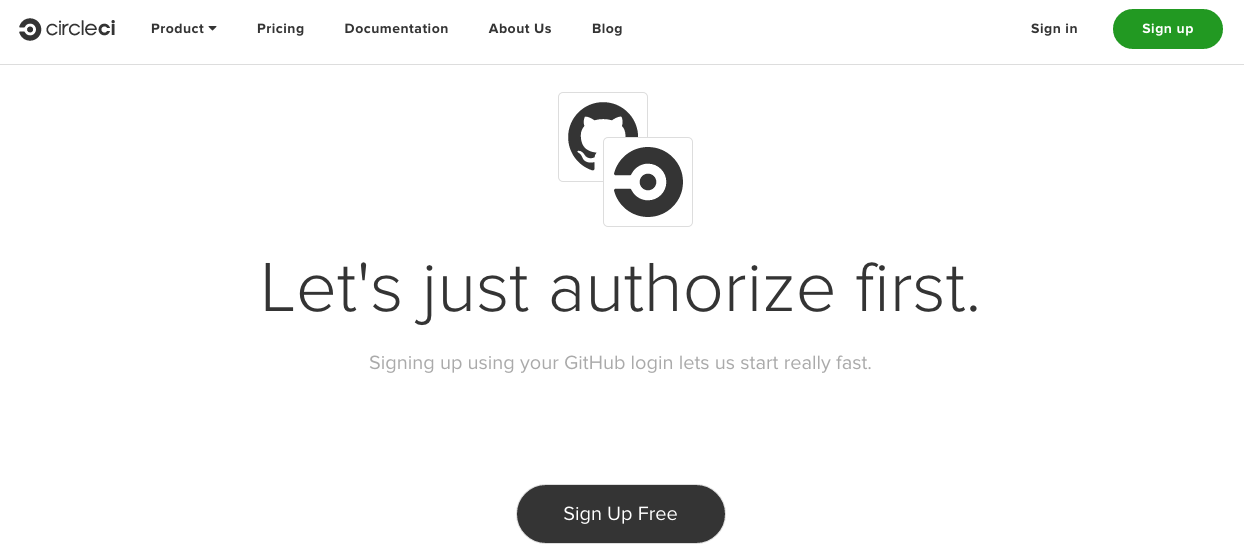
To start using CircleCI, log in via GitHub OAuth and “follow” the repository you want to use. In a web browser, navigate to the following page: www.circleci.com. Choose the link to sign up. This will take you to an SSO (single sign-on) page for GitHub. Using your GitHub login, enter your username and password information. GitHub will ask if CircleCI should have access to your repository. You will need to allow access for CircleCI to follow changes within the repository.
Adding your project
The project we want to automatically build on change is an open source repository hosted on our Woosmap Github Organization. After logging in to CircleCI, on the left-hand side menu, select the “Add Projects” option.
Organizations and Account
Choose an organization that you are a member of. You can also use your own GitHub account
Repository to Build
Choose a repo to add to CircleCI. It will start a new build for you each time someone pushes a new commit.
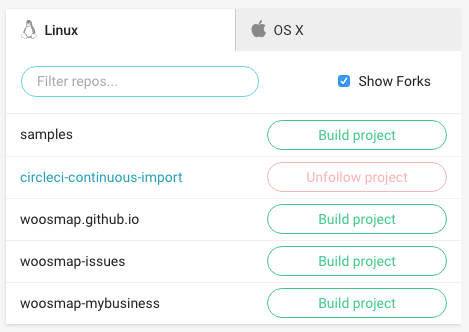
When selecting the repo to build, CircleCI automatically installs dependencies and starts to build. By default, if none circle.yml configuration file is found, the build will try to find a test folder but will fail and be marked as red.
Configuring Circle.yml
This file specifies which commands should be run on the CI server to test, build and deploy the application and/or data. Place it in your git repo’s root directory and CircleCI reads the file each time it runs a build (see configuration documentation). Here’s the configuration we set for this tutorial:
# Specify which version of python to use
machine:
python:
version: 2.7.12
# A basic test to validate the JSON data file
test:
override:
- python -m json.tool 〈 data.json
# To specify any dependencies
dependencies:
override:
- pip install requests
# Triggered when we push to the master branch
deployment:
release:
branch: master
commands:
- >
WOOS_URL=$WOOS_PROD_URL
WOOS_PRIVATE_APIKEY=$WOOS_PROD_APIKEY
python import.py
# Triggered when we push to the develop branch
all:
branch: develop
commands:
- >
WOOS_URL=$WOOS_STAGING_URL
WOOS_PRIVATE_APIKEY=$WOOS_STAGING_APIKEY
python import.py
As you can see, this configuration gives us control over:
- Environment Variables
- Python version
- Commands to install dependencies
- Commands to run tests and builds (if you don’t have any commands to run in this section, you must provide a dummy command such as /bin/true to avoid CircleCI complaining about missing tests)
- Commands to deploy the data to the runtime environment (keyed by the specific Git branch where the commit landed)
Test
Our needs for this sample do not require to set a complex test suite so we just validate that the input JSON data file is readable and properly formatted.
test:
override:
- python -m json.tool 〈 data.json
Environment Variables
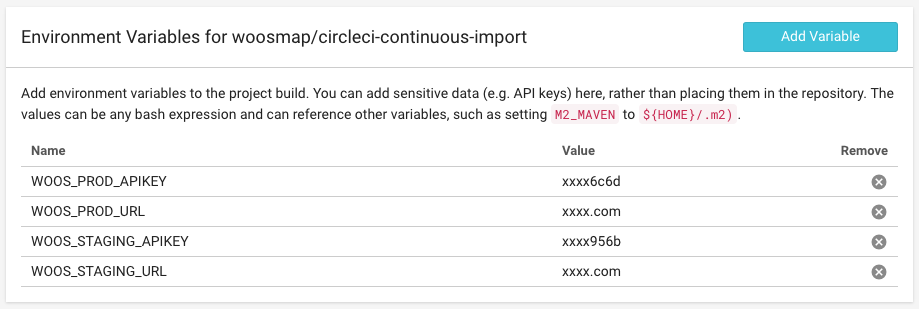
To manage keys that must be kept secret, CircleCI offers to create Environment Variables inside the project build configuration (see official doc for more details). As you can see above, in the detailed workflow, the develop branch is linked to our Staging server and the master branch to the Production server. We added custom variables for the APIKEY, and URL relevant to the branch the commit was pushed to.
To access the variable in the python script import.py you simply need to specify the corresponding property name like this:
private_key = os.environ['WOOS_PRIVATE_APIKEY']
api_server_host = os.environ['WOOS_URL']
Script
The import.py script executed at the end of each build operates a simple import to the desired environment (Staging or Production). In circle.yml config file, the script is launched according to these lines:
deployment:
release:
branch: master
commands:
- >
WOOS_URL=$WOOS_PROD_URL
WOOS_PRIVATE_APIKEY=$WOOS_PROD_APIKEY
python import.py
And here is the summary code of what is executed:
endpoint_json = 'data.json'
private_key = os.environ['WOOS_PRIVATE_APIKEY']
api_server_host = os.environ['WOOS_URL']
with open(endpoint_json, 'rb') as f:
data = json.loads(f.read())
session = requests.Session()
response = session.post('http://{api_server_host}/stores/replace'.format(
api_server_host=api_server_host),
params={'private_key': private_key},
json={'stores': data["stores"]})
Scheduled Build
Sometimes your data does not correspond to a flat JSON file but is returned by a web service that makes it really difficult to have a hook after changing data. You may need to configure a scheduled import triggered every X hours.
CircleCI is not designed for scheduled build. You can do so with competitors solutions like the well-known Travis-CI which have a Cron Jobs feature built-in. I would recommend using Travis-CI if you plan to do scheduled import but, as CircleCI offers an API, it’s also possible to run the build on demand and not only after a new commit.
Create a CircleCI API Token
Before using the API, you will need to create a Token attached to your account. Be careful that code and apps using this token can act as you, and have full read- and write-permission!
Navigate to CircleCI API Management and create a new Token.

Once your token has been created, you can use the API corresponding to the official documentation. For example, to run the build you will need to POST the following API URL like this:
curl -X POST https://circleci.com/api/v1/project/woosmap/circleci-continuous-import/tree/master\?circle-token\=1234_fake_token_122343Create a Scheduled Task using AWS Lambda Function
To trigger the API Call every X hours you need to set up a cron task. Amazon offers a simple way to do it using Lambda Function and CloudWatch Events. Follow this documentation to configure the trigger and the function. We added a sample lambda function inside the GitHub repo to help you deal with this feature. Here is what it looks like:
import json
import urllib2
def lambda_handler(event, context):
print("Received event: " + json.dumps(event, indent=2))
try:
request = urllib2.Request(
'https://circleci.com/api/v1/project/{project}/tree/{branch}?circle-token={circle_token}'.format(
project='woosmap/circleci-continuous-import',
branch='master',
circle_token='Fake_Token_a16I98h7b756b87dsgbb0f73c6b9fe435f1024'))
response = urllib2.urlopen(request)
return json.dumps(response.read(), indent=2)
except Exception as e:
print(e)
raise e
And that’s it. You can test your function and adjust the rate of each execution. In CircleCI you can verify that your build is really triggered and has a green mark.

Conclusion
We’ve demonstrated just a simple “Hello World” example of continuous delivery of your data with CircleCI and GitHub. These tools are working pretty well together and the setup is really quick!
We have slightly hijacked a little the original use of CircleCI just to show how helpful this solution could be. In addition, all services used in this tutorial have a free plan: CircleCI, GitHub (for public and open source projects) and AWS Lambda/Cloudwatch.
If you have any questions about the content or the process described, please don’t hesitate to reach out to me through the contact page.
Useful Links
- This script on the Woosmap Github Organization
- CircleCI Documentation
- Alternative to CircleCI : Travis-CI
- Tutorial to set Amazon Lambda Function and CloudWatch Event